Showing posts with label Fruit. Show all posts

Friday, 14 January 2011

Chocolate Orange Cookies


It's always exciting to try new recipes, and even more so to tweak recipes in your own individual way to make something extra special, but for me, the most exciting thing is to create a recipe that's completely your own. This is the first sweet recipe that I've ever invented myself, and as something from the baking realm it was quite daunting - things can go so easily wrong (and trust me, they did a couple of times) but when it works you get the greatest sense of achievement, well, in my opinion anyway.

So here's my little creation: Chocolate Orange Cookies. They're sort of cracked and glossy on the top and soft and squidgy in the middle - my ideal texture for a cookie. The orange flavour comes through quite strongly which is just my own taste, and the slightly bitter tones of the dark chocolate really set of the sweetness of the orange beautifully.

Chocolate Orange Cookies
300g dark chocolate
50g butter
2 eggs
170g soft light brown sugar
half a teaspoon of baking powder
125g plain flour
Zest of 2 oranges

Juice of half an orange

Preheat your oven to 170 degrees.
Melt the butter with
200g of the chocolate, set aside. Chop the remaining chocolate into chunks.
Beat the eggs, sugar and zest until pale and fluffy, then add the melted chocolate mixture.
Sieve in the flour and baking powder and combine.
Add the orange juice and the remaining dark chocolate chunks, then spoon on to a lined baking tray and bake for 0-5 minutes until they are beginning to crack on the top.
Leave to cool on the baking tray for a few minutes before transferring on to a cooling rack as they'll be very fragile and near impossible to transfer at first.

I gave these to a friend as part of her Christmas present and she seemed to thoroughly enjoy them and told me that the rest of her family were fans too, so I'm thrilled - I hope you try them, and try your own recipes too :-)

Sunday, 5 September 2010

Orange Madeira Loaf Cake


It's been a hectic few weeks and I've abandoned the blogosphere since the New Baby Cake which kind of took it out of me to be honest! Anyway, I finally found time to get back in the kitchen and made something considerably less complicated yet utterly delicious. It's a Rachel Allen recipe from her Home Cooking book which I love, I've mentioned it in previous blog posts and really rely on it as a go-to whenever I'm lacking in inspiration; in fact, it is probably second only to Hugh Fearnley-Whittingstall's Everyday book in terms of how often it gets used at Colehill Kitchen.

This time it was a lovely warming orange loaf cake, perfect now that the weather is cooling off, but not in the realms of dense wintery fruit or chocolate cakes. It's a nice change from the traditional lemon drizzle cake, but no less delicious.

Orange Cake
175g butter, softened
175g caster sugar
3 eggs
Zest of 2 oranges
225g plain flour
1 tsp baking powder
4 tsp freshly squeezed orange juice

Cream the butter and sugar until pale and fluffy. I used part golden caster sugar and part normal caster sugar, but it's entirely up to you!
Add the eggs one at a time, beating well between each one, then add the orange zest.
Sift the flour and baking powder then fold in with the juice, stopping as soon as all the flour is combined.
Transfer into a greased and lined loaf tin, then smoth out the top.
Bake in the oven at 170 degrees for 50-55 minutes until a skewer comes out clean.
Allow to cool on a wire rack.

The icing in particular went down a storm, which was simply 75g icing sugar and 2-3 tbsp of freshly squeezed orange juice. Combine the juice with the icing sugar gradually until it is soft but not runny, then spoon over the cake.


Slice and enjoy with a cuppa for the perfect afternoon tea!

Friday, 9 July 2010

Hummingbrid Blueberry Cake


This week I decided a knock-your-socks of cake was in order. I've been on a rather more delicate trend with my baking exploits recently with Lemon cake, Snickerdoodles, and Bakewell Slices. Even the heavier desserts I’ve made like the Cheesecake and Chocolate Mousse Cake haven’t been sponge based, and I had a real hankering for a proper cakey cake if you know what I mean!! With tons of icing and everything!!

So I asked myself, which recipe book that I own is most likely to contain lots of delicious cakes? Clearly Hummingbird was the only answer!! Despite wanting a big old cake, with all this lovely hot weather I wasn’t quite in the mood for chocolate, and berries seemed the obvious choice of flavouring. This cake is baked in a ring shape in the Hummingbird book, however I don’t own one of those (yet!) so my reliable old round cake tin had to make do!!

It’s no ordinary cake recipe; the ratio of eggs, butter, sugar and flour is nothing like any other cake I’ve made – for starters there are SIX eggs!! … and then the very healthy addition of sour cream, which, you know, I have no problem with!!


Blueberry Cake:
350g unsalted butter
350g caster sugar
6 eggs
450g flour
2 tblsp and 2 tsp baking powder
280ml soured cream
250g fresh blueberries plus extra to decorate

Cream the butter and sugar until pale and fluffy, then add the eggs one at a time.
Beat in the sifted flour and baking powder until well mixed, then add the soured cream and mix well until liht and fluffy.
Gently stir in the blueberries and pour into a tin and bake at 170 degrees for 40 minutes or until a skewer comes out clean.
Leave to cool on a wire rack. When completely cooled cover with the cream cheese frosting and sprinkle with blueberries.

Cream Cheese Frosting:
600g icing sugar
100g unsalted butter
250g cream cheese

Combine the icing sugar and butter until well mixed, before adding the cream cheese and beat until light and fluffy.


The blueberries all sank to the bottom of the mix while it was baking which was disappointing, but I was more grumpy with myself because I completely forgot that a good way to avoid this is to quickly toss the berries in flour before mixing them into the batter. A handy hint for if you decide to make it!! Anyway, all was not lost because I turned the cake upside down to ice it, which resulted in almost a layering of sponge, then a really moist and berry-heavy section before hitting the cream cheese frosting…deeeeee-licious!!!

I’m not completely convinced by this cake; I think there are better sponge recipes out there, however I did want a really dense cakey-cake and that’s exactly what I got! As for its aesthetics, the snowy white of the frosting looked beautiful speckled with deep navy blueberries, and I did like the way the colour from the layer of blueberries bled into the pale yellow sponge dappling it with a deep purple which faded in to a paler lilac colour.


This is definitely a heavy cake, in typical Hummingbird fashion – they don’t do anything by halves!! I would say it’s probably best as an afternoon tea type of thing rather than dessert – I just can’t imagine ever having enough room for this cake after a meal! Either way though, completely indulgent and berries add a summery touch, enjoy!!


Friday, 18 June 2010

Oat, Seed and Fruit Booster Bars, HF-W Style!!


Following the banana heavy theme from my Banana Bread post, to finish using up my nine blackened bananas I made what I think may be the most tasty thing ever to have come from my kitchen, and it’s all thanks to Hugh Fearnley-Whittingstall. I’ve said before how I pretty much idolise him and everything he stands for, and his book River Cottage Everyday has to be one of my favourite cook books, hands down. This time I made his Booster Bars to continue using up the bananas and generally because they look so absolutely scrumptious, and in typical fashion, Hugh delivers another delicious recipe.


These are also wonderfully simple to make, and so so so satisfying when they’re done!! The recipe is as follows:

Booster Bars
125g unsalted butter
150g soft brown sugar
75g runny honey
1 orange zest
1 lemon zest
200g porridge oats (not jumbo)
150g mixed dried fruit
150g mixed seeds
1 mashed banana

Melt the butter, sugar and honey in a saucepan on a low heat. I substituted half the honey for golden syrup merely because I ran out of honey, but I think it gave the bars an even more indulgent texture and taste, and would thoroughly recommend it if you have any syrup in the house!

In a separate bowl combine the oats, orange and lemon zest, dried fruit and seeds. I used raisins, chopped dried apricots and chopped dates, along with pumpkin and sunflower seeds. Pour the melted mixture over the oats and fruit and combine thoroughly, mixing in the mashed banana at the end.

Flatten the mix into a lined baking tray and drizzle with a little more honey or syrup if you're feeling indulgent!! Then bake at 180 degrees for about 20-30 minutes or until the top begins to go golden.

The next step tested every shred of willpower and self discipline I had, and I almost broke a couple of times: leave in the tray until it has completely cooled!!! It is almost impossible to get the whole thing out of the baking tray when it’s warm (trust me, I tried) so hold back and leave it until it has had time to harden slightly, before tipping out onto a board.


Then comes the fun part, slice into whatever size bars you want, and be sure to devour any crumbs or edges that may not make the final cut!! This recipe is more delicious when freshly baked than a few hours or days later so make the most of it and scarf down whatever falls off the board before anyone else catches on! The ever so slight warmth when they’re fresh allows the orange and lemon zest to really come alive, and the bars have an ever so subtle festive taste to them that reminds me of Christmas…this is definitely a recipe I’ll be digging out in December!


The oats are soft and yielding when you take a bite, contrasted with the crunch of the seeds and the gooey dried fruit chunks. A truly spectacular recipe that is so easy it defies belief, I urge you to throw together a batch – they are perfect for a breakfast on the go, a snack for a boost of energy you need during that mid-afternoon slump (hence the name!!) or just as a treat that thanks to all the fruit and seeds isn’t completely guilt-heavy!!

Thursday, 10 June 2010

Dense and Sticky Banana Bread


I have just looked at when my last post was written, and I’m horrified to see it was over two months ago!! I have no idea where that time went…actually, I know exactly where it went; straight to the library where a cavern full of books awaited me and several essays to write for the end of term beckoned. And that is why food and cooking has taken a massive back seat, which makes me really, really sad. On the bright side university is now over for the summer, which means I have plenty of time on my hands to dedicate to cooking. I celebrated by getting stuck into lots of time in the kitchen!!

This weekend I baked a couple of loaves of bread with a shiny new loaf tin; one packed full of seeds and one covered in oaty goodness, which were absolutely delightful. There is nothing quite as homely and comforting as the smell of fermenting dough and the subsequent aroma of the loaves baking in the oven, which fills the house. Following in the bready theme I made a loaf of banana bread, using a recipe from Sophie Dahl’s
cookbook. It’s a beautiful book and I love to flick through it from time to time, but this is the first time I’ve actually used one of her recipes. This is quite the norm for me: I buy books and books and books, and spend hours perusing the pictures and recipes before I finally settle on one to actually make. There are usually far too many to choose from to make a quick decision!!! Anyway, we had a glut of overripe bananas in the house, so my mission was to use them all up (nine in total - why we had managed to collect nine overripe bananas is beyond me but there you go!) and Banana Bread seemed the obvious first choice.


It’s a wonderfully easy recipe, quick to assemble before waiting patiently for an hour as the bananas caramelise and the batter becomes a soft, sweet and sticky delight! The recipe calls for:

Banana Bread
75g soft unsalted butter
4 overripe bananas, mashed
200 soft brown sugar
1 egg
170g flour (I used self raising flour and forfeited the baking powder she lists as it was all I had in the cupboard)
I also added a sprinkling or cinnamon, just because I like it!!

Combine the butter, mashed bananas, sugar and egg, then add the flour and cinnamon (if you decide to add some) until it’s just combined.
Pour into a lined loaf tin and bake at 180 degrees for an hour.
Leave to cool on a wire rack.

This recipe produces a dense banana loaf…rather more like a heavy cake than a bread-like end result. I impatiently (as is tradition!) tipped it out of the tin and cut a slice as soon as I could, with a little dab of butter smeared over it. The smell of bananas infused with cinnamon saturated the kitchen, and it was all I could do not to eat slice after slice of this deep caramel coloured indulgence!!


This recipe really is best when you use completely black skinned bananas, as the more overripe they are the better the mashed banana will caramelise while it bakes, resulting in a toffee sweet luxury that will have you sneaking slivers every ten minutes!!

Tuesday, 9 February 2010

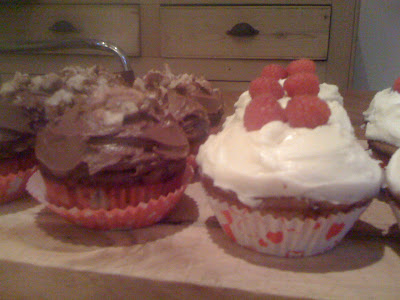
Raspberry and White Chocolate Cupcakes...and some Chocolate and Banana ones too!


Have you ever had a craving to just spend the day in the kitchen and cook all day long, or is that just me? Last week I ordered three new cookery books through no fault of my own...I had these three books in my Amazon basket, pondering which one - yes, just one - to buy, when someone (who shall remain nameless!) clicked on 'place order' when I wasn't looking. Unbeknownst to him, my card details were saved on Amazon, and the order was placed without asking me for payment or shipping details. So, now I have three shiny new books with zero guilt - because I didn't order them!! I can't be too grumpy really can I?! Anyway, They arrived last Monday, and all week I've been poring over them all week, desperately waiting for a free day to try out some of the recipes. I imagine you're interested in which books I actually bought, and if you aren't you should be...they're all beautiful books, brimming with delicious recipes.


The first was Rachel Allen's Home Cooking, an absolute gem of a book, just a delight to sit and read, whether or not you get around to cooking anything from it! Now, because I am the height of cool, I got my Post-Its out and started noting which recipes I really really really wanted to make (because I really really want to try them all, but short term this is clearly not feasible!!) and before I knew it, the book had little pink feathers peeking out from pretty much every other page, if not more!! The book is just jam packed with delicious ideas for breakfast, Sunday Lunch, Suppers, Puddings, Treats, Snacks...even Baby Purees!! You could just have this one cook book in your life and I doubt you'd ever get bored of the recipes - if only because of the sheer volume of them! Before I get completely carried away, I'll stop myself from waxing lyrical anymore, and just tell you that I ended up making one of her Stuffing recipes (because it was Sunday when I spent the day in the kitchen, and Sundays demand roast chicken), which was utterly delicious - I just wish I'd had the foresight to double the recipe - as well as her Butternut Squash Gratin. I'm actually salivating as I think about that gratin. It was so delicious, and so simple! Just bring some cream with a finely chopped clove of garlic in it to the boil, then pour over thinly sliced squash, sprinkle with parmesan, and bake for 45 minutes or so. The cream and the cheese, of course, made it a winner, but I definitely prefer it to potato gratin for the velvety texture of the squash. The orange flesh just melts in the mouth, and the sweetness from it works beautifully with the fairly subtle flavoured cream sauce and bubbly cheese topping. Five stars for that recipe!


Now, I know what you're thinking. You're wondering 'Why is she banging on about stuffing and gratin when all I can see are pictures of cupcakes?!'. Well, that is because the second book in my basket was Cupcakes from the Primrose Hill Bakery. I have about a thousand cupcake books now...I'm going to need a whole room dedicated to cupcake books one day, but they're so pretty! This is another example of a well put together book, the pictures are mouth-wateringly beautiful, and make you want to drop everything and spend hours in the kitchen whipping up batch after batch of cupcakes! (This, incidentally is what I did on Sunday...I ended up with 36 cupcakes...and only 4 people in the house). I couldn't decide on one type to make, so I settled on Raspberry and White Chocolate, and Banana and Chocolate. One word: Yum. I thought I'd found the Holy Grail of cupcakes with the Hummingbird Bakery book, I made some utterly delicious cupcakes from that book, including the Black Bottom recipe, and I'm not saying they've been beaten - but they've definitely got a run for their money!


The first batch I made were these delights - Raspberry and White Chocolate cupcakes. The batter is pretty basic - cream the butter and sugar until pale, combine the egg, milk and vanilla essence in a separate jug, and sieve flours into a separate bowl, then add the flour and liquid alternately a third at a time until everything is incorporated. This is then marbled with raspberry jam. When the cakes are cooked and cooled, you then hollow out a little well in the centre of them, and fill with even more jam!! Then cover with the ivory white chocolate buttercream icing...generously!!

Raspberry Jam Cupcakes
110g unsalted butter
180 caster sugar
2 eggs
125g self raising flour
120g plain flour
125ml semi-skimmed milk
1 tsp vanilla extract
3 tblsp raspberry jam

White Chocolate Buttercream
Make up a batch of Vanilla Buttercream by combining the following ingredients, then add 100g of melted white chocolate to four tablespoons of the mix.

110g unsalted butter
60ml semi-skimmed milk
500g icing sugar

These were certainly popular, I'd say they outdid the Banana and Chocolate batch, but this was really a question of 'which delicious cake is more delicious than the other?!!' The other delicious cake was just are irresistible - underneath a thick blanket of chocolate buttercream hid a deliciously soft sponge, laden with slightly bitter dark chocolate chunks and soft, sweet swirls of banana.

Banana and Chocolate Cupcakes
125g unsalted butter
250g caster sugar
2 eggs
1 tsp vanilla extract
250g plain flour
2 tsp baking powder
4 ripe bananas, mashed
175g dark chocolate, chopped

As usual, cream the butter and sugar until pale and fluffy, then beat in the eggs and vanilla extract, before adding the siefted flour and baking powder. When the batter comes together, gently fold in the bananas and chocolate. These, and the Raspberry cupcakes took about 10-12 minutes at 180 degrees, test with a skewer, if it comes out clean they're ready to take out of the oven.

Chocolate Buttercream
175g dark chocolate
225g unsalted butter
1 tblsp semi-skimmed milk
250g icing sugar

Melt the chocolate over a pan of simmering water, then set a side to cool slightly. Beat the remaining ingredients together, and when smooth, add the melted chocolate to create a delightfully decadent and sinful bowl full of glossy goodness!! When cooled and iced, sprinkle a few chopped walnuts on top if you like (for the healthy element you see...)


I've well and truly got the cupcake bug again...I'm just warning you, it could result in an inordinate amount of posts on these little beauties, not that you'd complain I'm sure!! There's something so dainty and civilised, yet greedy and naughty about cupcakes, that they are completely irresitible. I can't think of anything I'd rather have as a treat, or what I'd rather give as a home made gift, or offer to guests...they fit every occasion, and everyone gets so excited by them!! There's nothing better than making someone smile with something you've made, and cupcakes seem to win every time. They're perfection in a paper case!

Sunday, 1 November 2009

Delicious Lasagne and Apple Pie


Autumn just makes me want to snuggle up on the sofa with a giant mug of tea and lots of warming food. The colder weather and drizzly days are such a great excuse for whipping up a load of comforting food and indulging in some really cosy nights in. I love baking on a wet and rainy Sunday afternoon, filling the house with delicious smells and eating home made scrumptiousness!! This weekend we had a busy Friday and Saturday, and Sunday was really gloomy and rainy, so it seemed the perfect day to hole up in the kitchen and make lasagne and apple pie - possibly two of the most warming, comforting dishes ever to have been invented. I mean, having a creamy, rich and meaty lasagne followed by sweet apple pie with melt-in-the-mouth pastry for dinner can only make things better...and a perfect end to the weekend!


The lasagne was a giant dish of hearty goodness, layers of deep tomato and meat sauce, cheesy bechamel and pasta, topped with even more cheese. I softened some onion and garlic, then added the beef mince and browned it off. After that I squeezed in a tablespoon or so of tomato puree and cooked it out for a couple of mintes, a splash of red wine, a tin of chopped tomatoes, about half a tin of water, and seasoning. Then I let it simmer for about 45 minutes for a really deep flavour. For the cheese sauce I made a simple bechamel and added a generous couple of handfuls of cheddar cheese. Then I assembled the lot layering the meat, then pasta, then cheese sauce, and repeat finishing with the cheese sauce and an extra sprinkling of cheese. Bake for about 30-40 minutes in an oven at 180 degrees until the pasta is soft (I checked it by skewering it with a butter knife, and took it out of the oven when the knife slid through easily). And then a lovely big portion each, Yummmmmm!!!


Then on to the apple pie :-)


I used a pastry recipe from Valentine Warner's book 'What to Eat Now, More Please!' which was really lovely. Pastry is always a slightly nerve-wracking prospect I think, but this one was really buttery and short, and deliciously melt-in-the-mouth. Not overly sweet, it complemented the cinnamon flavoured apples beautifully, and an extra sprinkling of vanilla sugar on top was perfection! I didn't have a pie dish, so I used a cake tin, which worked just as well, and made for a deeper pie, which can never be a bad thing!! For the apple filling I followed a Hummingbird Bakery recipe, which I've used before for brownies, cupcakes and a chocolate cake. The Bramley apples are sliced and cooked in butter, cinnamon and caster sugar until slightly softened, then placed in the raw pastry case, and baked for about 35-40 minutes at 180 degrees until golden brown. Leave to cool for a while, then we had it with a healthy dollop of custard.


Needless to say we put away a hefty amount of pie in one sitting, and were completely stuffed... and happy!!!